When fitting new brake discs and pads, careful preparation is vital to avoid brake judder. In many cases, no symptoms of brake judder will be apparent following the fitment of new discs. However, after a few thousand miles, vibration through the brake pedal and steering wheel can be felt. This vibration is often caused by disc thickness variation (D.T.V.). Blue Print offers advice on steps to take to avoid these potential problem.
It is important to thoroughly prepare all mating surfaces and remove any corrosion from the wheel hub, to ensure it is clean and free from defects. Then, using a suitable solvent such as brake cleaner, remove any traces of the anti-corrosion preservative from the new brake disc faces before fitting.
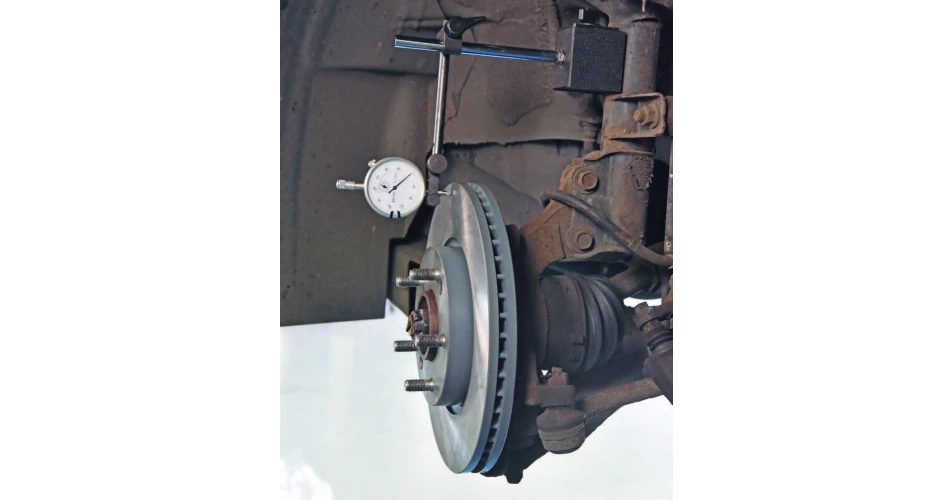
Following the installation of the new parts, the importance of checking disc ‘run-out’ after assembly cannot be emphasised enough. Excessive ‘run-out’ can lead to increased pedal travel, caused by the caliper piston being pushed back by the brake disc; this can also result in vibration under braking.
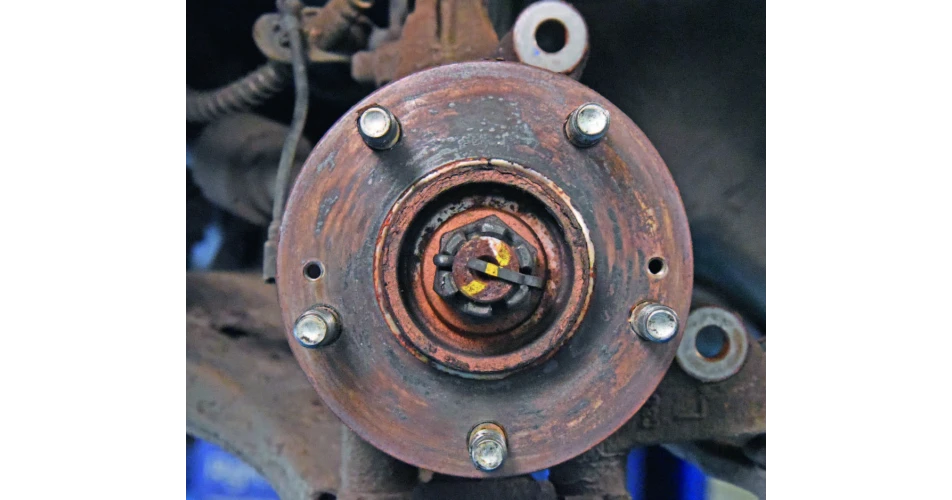
The mating surfaces of the brake disc or wheel hub can be the main cause of this excessive ‘run-out’. If the mating surface is worn or not completely clean (Fig 1) – for example a small particle of grit or rust measuring just 0.05mm on the hub – the result could be a ‘run-out’ figure of over 0.10mm when measured at the contact surface of the brake disc. (Fig 2)
Brake disc ‘run-out’ must be checked with a dial gauge (Fig 2) with the brake disc secured to the hub, taking note of the point of maximum variation. The utmost recommended ‘run-out’ is 0.10mm - however, this number may be lower subject to the vehicle manufacturer’s specification.
If the ‘run-out’ figure is indeed excessive, it may be possible, depending on vehicle application, to fit the disc in an alternative radial position on the wheel hub - i.e. turned through 90° and then re-assembled.
D.T.V. is usually created by the disc running out of true and making partial contact with the brake pads, when the brakes are not being applied. At these localised points of contact the disc is worn at a greater rate than normal and as such, variation in the thickness of the disc occurs. When this happens, the vibration under braking will become apparent.
D.T.V. of the brake disc can also be measured separately using a micrometer; the measurements should be taken at points A, B, and C (Fig 3) at various positions around the disc. Variation in thickness of as little as 0.025mm can cause vibration and judder when under braking, and with some vehicles, this figure can be even lower.
Before installing new brake pads and discs, it is important to check the caliper and carrier for wear and damage.
- Remove all surface rust from the brake pad mounting area.
- Check operation of parking brake mechanism.
- Check the condition and operation of the caliper sliding points.
- Depending on the brake design, be sure to also clean the caliper bracket guide surfaces.
- Check the brake caliper, bracket, fixings, guide plates and other small system parts for rust and damage and replace if necessary.
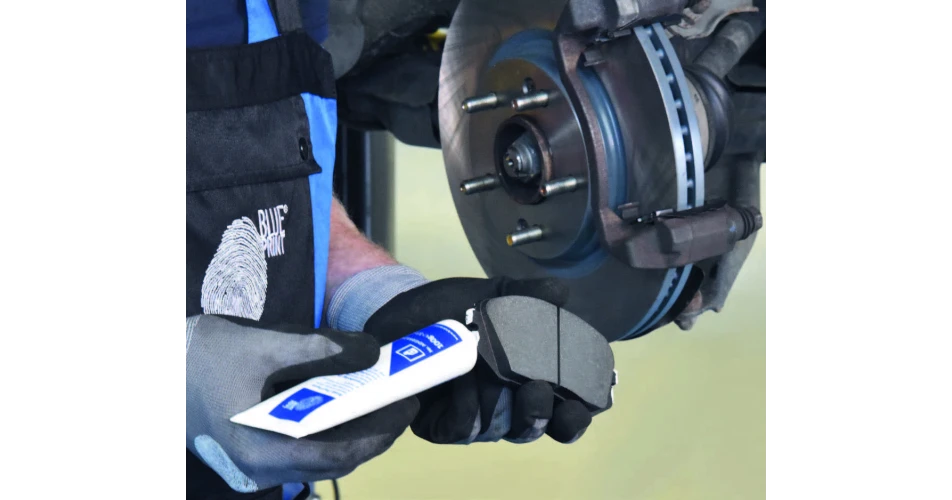
Use a high-temperature-resistant and metal-free grease such as ceramic paste, to lubricate the mounting surfaces, along with the guide and contact surfaces on the caliper bracket and brake pad. (Fig 4).
When refitting the wheel after all the brake parts have been assembled, inspect the mating surface for corrosion and defects, and clean as necessary. Tighten the wheel fixings to the vehicle manufacturer’s settings; being careful not to overtighten these fixings as this can result in damaging the wheel hub which, in turn, can also lead to brake judder.
Avoid excessive or high-speed braking until the brake pads and disc are bedded in – a mileage of 150-200 miles (250-300 km) is recommended. Excessive harsh braking during this period can cause heat spots with a consequent reduction in braking efficiency. Remember that brake discs and pads are safety critical components and regular inspection is essential for the safety of the vehicle owner and other road users.
Rely on tested, OE-matching quality replacement parts from Blue Print. The entire range of braking replacement parts can be found at: partsfinder.bilsteingroup.com.
To read more of this technical article or download the entire article click
here. There are lots more Tech Tips to view, and they are all searchable, on
TechTips.ie.